Crochet Blocking (Ripple Baby Afghan)
When I started my Christmas crafting I polished up my rusty crochet skills and I’ve rediscovered my enjoyment of the craft. I don’t know many people who are crocheters. I do know many knitters. I haven’t attempted knitting; it is very intimidating to me because with crochet you have only one hook to work, with knitting you have at least two, maybe more if you are working on something like socks. So, I stick with crochet and I’m fine with that for now. In the future, I may attempt knitting, but with all the other unfinished projects around here it probably won’t be anytime soon.
I’ve got several crochet projects that I’d either like to do or need to do, though most fall into the “like” category. The first one I tackled is a baby afghan for my brother and sister-in-law’s newish baby. I was hoping to whip this out and get it in the mail soon after his birth, but he’s about a month old now and I’ve finally got it finished.
This afghan presented several new things for me. The first is that it is a ripple blanket, so I was able to learn one technique for creating ripples and I found out that I love them. Ripples are technically easy, but they look so pretty. Simply rippling colored stripes makes them so much more appealing than plain horizontal stripes could ever be. With all these stripes, I had to hone my yarn-joining skills. I’ve previously avoided changing colors as much as possible because I’ve always found it intimidating. While frequent color changes still means lots of weaving the ends in after the project is completed, I’m proud to say that I’m no longer scared of joining in a new color. The last technique that I had to use is blocking. When I was done with the afghan, it was ripply. Not in the pretty, colored, stripey way, but in the way that it didn’t lay flat. I’ve never had a chance to use blocking and I probably would have avoided that, too, if I had known I would need to do it when I first started. However, blocking is easy-peasy. I’ll demonstrate the method I used, which doesn’t use a blocking pad, since I don’t own one.
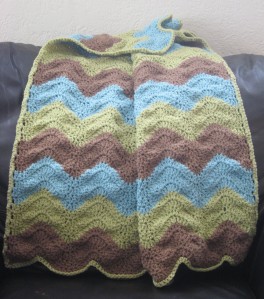
But first, here’s the finished baby afghan. I used Lion Brand Yarn’s Simple Ripple Baby Afghan.
Now, for the blocking method. Blocking is a technique employed to stretch a crocheted piece to size and allow the fibers to relax to a flat, square (or round or rectangular) shape. The basic steps are pinning your piece to a surface and then dampening it and allowing it to dry. I’ve seen blocking used most frequently for granny squares to ensure all are the same size before joining.
If you are inclined to purchase a blocking board, then by all means, do so. They are a little pricey, so I had to make do. I decided to use my wool living room rug. I placed a cotton sheet on top of the rug and made that my blocking surface. It’s useful to have a measuring device of some sort to make sure that your sides are really even, since eye-balling measurements isn’t always very exact.
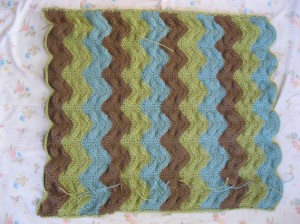
I placed the afghan flat on my blocking surface.
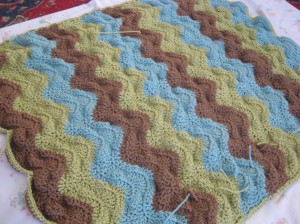
Next, I placed a measuring tape along one of the long edges to make sure I stretched it to its full length, 34″. Starting at one corner, I started pinning the afghan, along its edge, to my blocking surface. Instead of placing the pins perpendicular to the surface, I angled them out slightly so that they would be more secure when there was a little pressure placed on them as I continued gently stretching. Since this was a ripple afghan, I used the hills and valleys on the short ends as a guide of where I pinned, one pin in each valley and one in each hill. On the long sides, I placed the pins 3-4″ apart. It’s important to smooth the afghan as you go and smooth it out from the middle, not just pull on the edges, otherwise you will end up with stretched edges and a ripply center.
It’s a little difficult to see the pins in this photo, but they are there (with yellow heads).
After I pinned all sides, I spritzed the afghan with water in a spray bottle until it was uniformly damp, but not wet. I left it on pinned on the blocking surface until completely dry. When the pins are removed, the afghan will stay in same shape as when it was blocked.
Blocking is also useful in getting an older afghan back into its original shape. You would follow the same steps for an older afghan, but wash it first.


Beautiful! I don’t know how to crochet but I sure do admire those who can take a piece of yarn and make something beautiful!
I love it!
i love baby gifts and i love to give baby gifts to my baby and also the my sister’s baby ,`”
Thank you for the blocking tutorial. I will be blocking a baby blanket tomorrow. Love how you made due with what you had at home and passed along your tips.
Thanks for visiting, Carie. I hope that it was helpful for your baby blanket project!
Thank you for these instructions. I’ll be blocking a baby blanket soon. It has the double crochet clusters so I don’t want to flaten them. It also has wavy ripples around the 3 in. border. How do I block the border without messing up the wavy border? Finally, can the baby blanket be washed and dried in the dryer after it is blocked?
Carol C.
As you can see from the photos, this also has a gently wavy border. The way that I kept it wavy was to place a pin in each of the valleys and mountains of the ripple and that seemed to work well. After it is blocked it can be washed and dried, however I have heard that it may need to be blocked again after multiple washes, but I’m not sure on that since all the baby afghans I’ve made have been gifts and I haven’t had to care for them myself.
I’ve also been very intimidated by blocking. Did you really stretch the whole thing out, or was it more of a gently pulling it into a uniform shape?
It’s more of a gentle pulling that stretches it out. Kind of smoothing out from center out towards the edges and then pinning them straight. Good luck, it’s really not as bad as you might imagine!
Thank you for your advice. I am working on a blanket made from several different squares. My main square has a very rippled center and flat edges. I had given up hope in getting it flat when a friend suggest I try tacking ( otherwise known as blocking) my square. I had no idea how to do this so I’m glad I found your tips through google. Thanks so much for the help. Now I don’t have to start all over .
Just finished my first baby blanket today. No, its not perfect but close. It definately needed to be blocked and after looking online I found yours to be the best way for mine. I put down a large towel on the carpet and had very long pins and began to work on gently smoothing out from the center when I was done I measured to make sure all was even. Next, I put another towel over the blanket and took my clothes steamer and went over it lightly a few times and let dry. Just took out the pins and it looks great. Thanks again for passing on your ideas!
Linda
I’m so glad that my tips were helpful to you, Linda. Thanks for commenting!
Thank you for sharing your tips! I have several baby blankets that need blocking, but have been too completely intimidated to even try! Your advice makes the whole process seem quite simple…thank you!
haha, making this exact blanket and was concerned about the waves in it. Good to know that I can fix it when finished.